Bring your outdoor ideas into fruition this summer with a new pea gravel patio. Learn how to install a pea gravel patio that will look rustic yet elegant. Perfect for any country home.
This post may contain affiliate links. Please read our disclosure policy.
When most of us envision gravel we think of chalky, sharp-edged chunks of rock we’ve seen on country roads. Gravel is cheap, but it could never look right in my backyard you may be thinking.
However, multi-colored pea gravel is a great way to bring a french country style to your backyard that is rustic yet elegant. Install the pea gravel patio of your dreams with a bit of planning and effort with this simple guide. It is so worth the hard work.
These glossy pebbles are an excellent alternative to a standard wood deck. With skyrocketing prices of lumber, it’s no wonder people are looking for alternatives. It’s also an easier process than laying brick pavers, though my husband and I considered this alternative too.
Building a pea gravel patio is essentially just digging a few inches of dirt out, leveling the area, spreading a layer of base gravel, and then topping with a final layer of pea gravel.
You can even add flagstone for an added touch of ambiance, whether for a walkway or scattered throughout the area. Line the edges with cobblestone or timber and people will have no idea the reason you choose this method was for affordability.
The finished product looks classic and stunning.
Benefits to Installing a Pea Gravel Patio
- Prevents erosion, allowing plenty of water to drain through
- Affordable cost compared to lumber or pavers
- Less labor intensive than alternatives
- Not many special tools/skills needed
Before you begin, there are a few supplies that you’ll need to complete your pea gravel patio project.
Tool and Supplies for Building a Pea Gravel Patio
- Marking spray paint (use a bright color that will be easy to spot)
- Rubber mallet
- Mason line string
- Stakes
- Square point shovel
- Landscaping fabric & pins
- Base gravel (optional)
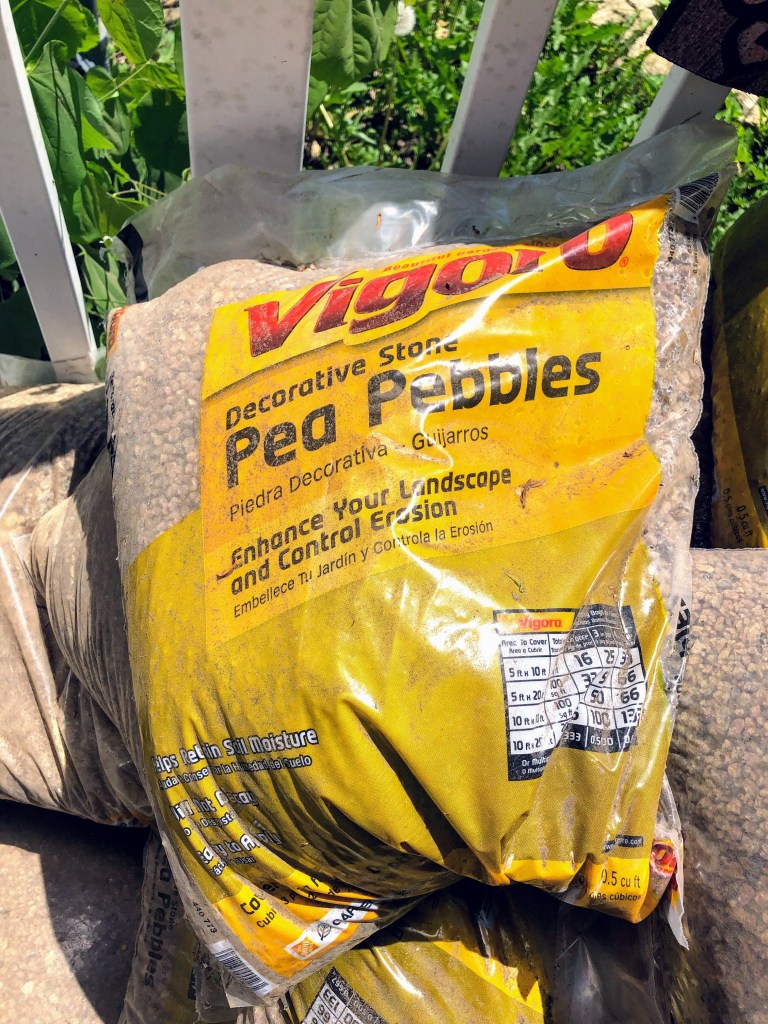
- Pea gravel (we used Vigoro Decorative Stone Pea Pebbles)
- Wheelbarrow (for hauling any gravel to your patio and removing dirt)
- Leveler
- Tamper
- Landscape timber or plastic/metal edging to frame the patio
If going the timber route for edging, you’ll also need:
- 2-inch deck screws
- Corner braces
- Mending plates
If going the plastic edging route, you’ll also need:
- Landscape stakes
How to Install a Pea Gravel Patio
STEP ONE
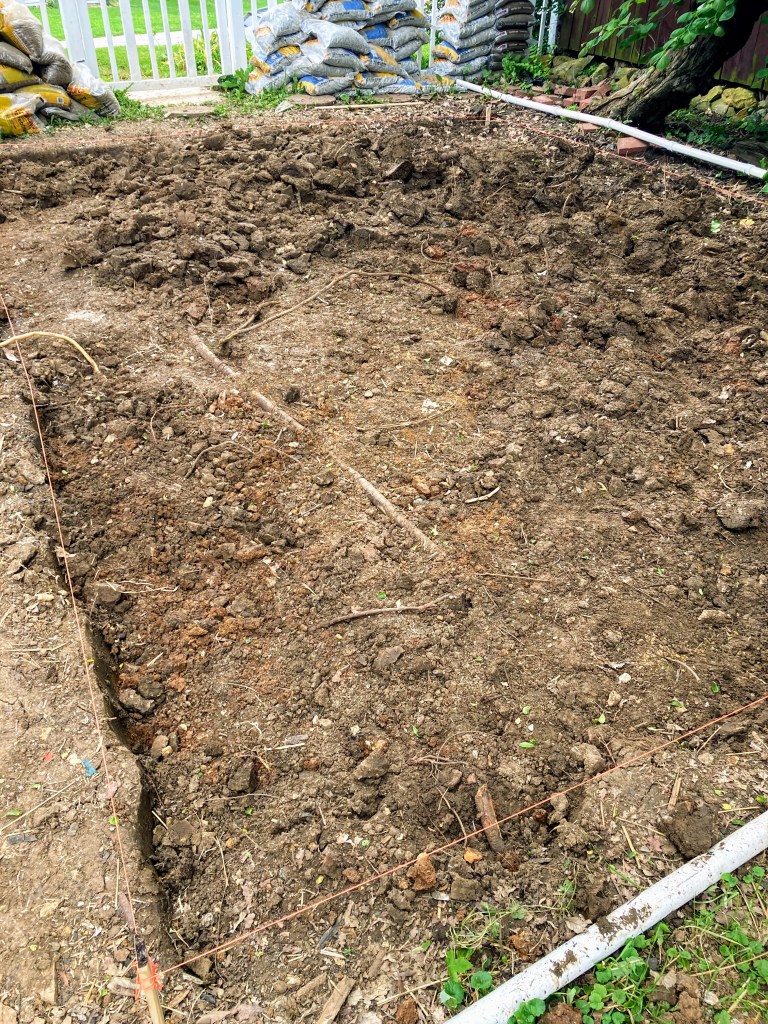
Measure out and mark the patio area.
We bought marking spray paint but never ended up using it. Instead, we used 8-ft timber edging and lined it around the area and then used a rubber mallet to hammer stakes at each corner. I then used mason line string, tying off and looping at each corner stake, to line the perimeter of the area.
STEP TWO
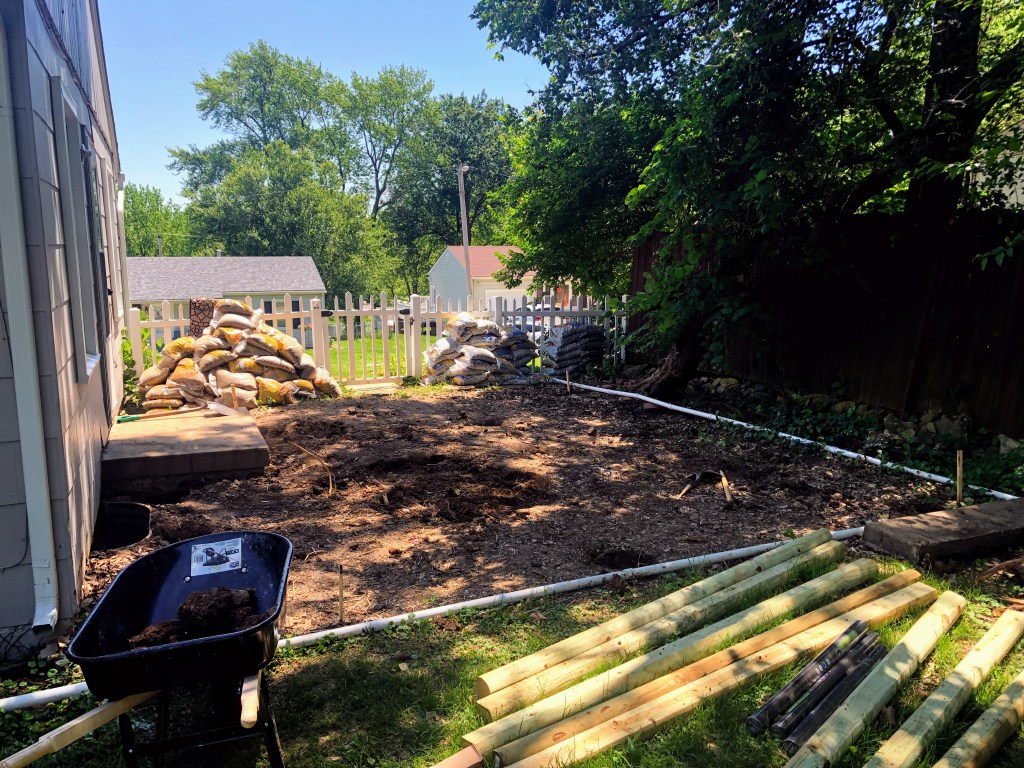
Start digging and dispose of/reallocate the dirt.
We received help from my husband’s parents, which was so beneficial and truly needed. This is not a one-person job. Our patio is 17 x 18.5 ft and although 3-4 inches isn’t that deep, it takes a lot of time and energy to complete this step. You will need help, especially if you’re hauling the excess dirt up a hill to an empty garden bed like we decided. My husband used a wheelbarrow for this, but eventually he turned to using plastic sleds because it was much easier to pull up an incline.
Dig about 4 inches deep, allowing enough depth for one inch of base gravel and then 3 inches of the top layer of pea gravel. If you have really dry, hard dirt in some spots, lightly water these stubborn areas with a water hose to get the soil workable enough to dig out.
For the edges, using a square point shovel will help you achieve a perfectly straight line, corner to corner. Get the entire area as level as you can using a garden rake to spread the top layer of soil as evenly as possible in case you didn’t dig the entire area perfectly even.
STEP THREE
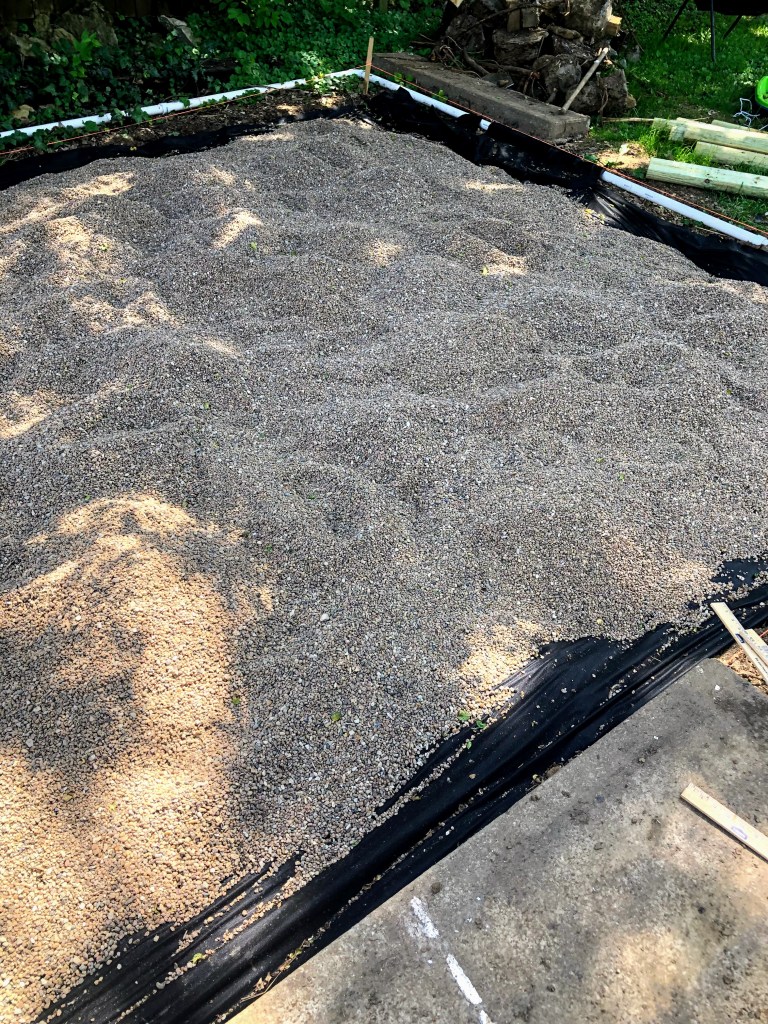
Tamper the area and pin down landscaping fabric.
Luckily we have clay soil, so we were able to compact the dirt down with a tamper and by foot–yes, by foot! Looser soils may require you to rent a plate compactor that makes the job a lot easier. We lucked out on this step. A leveler will also help you get the soil relatively level.
Next, we rolled out the landscaping fabric and pinned the ends and middle edges to prevent the wind from picking it up before adding the gravel. If you run out of pins, start grabbing extra tools or supplies to hold it down before adding gravel.
STEP FOUR
Add a base layer (if needed) and add pea gravel.
Compared to the previous steps, this was an easier one. Though the bags of gravel we bought weighed 50 lbs each, all we really had to do was pour it over the dug up area. You should use a base gravel, about one inch, but if you have clay soil you can probably get away without using a base layer. The base will give the pea gravel a better foundation, though, so keep that in mind.
Next, add up to three inches of pea gravel on top and again use a garden rake to spread all this out evenly, leaving a gap along the edges for adding whatever border you’ve decided on. Tampering the gravel afterward helped us tremendously in leveling the gravel out.
STEP FIVE
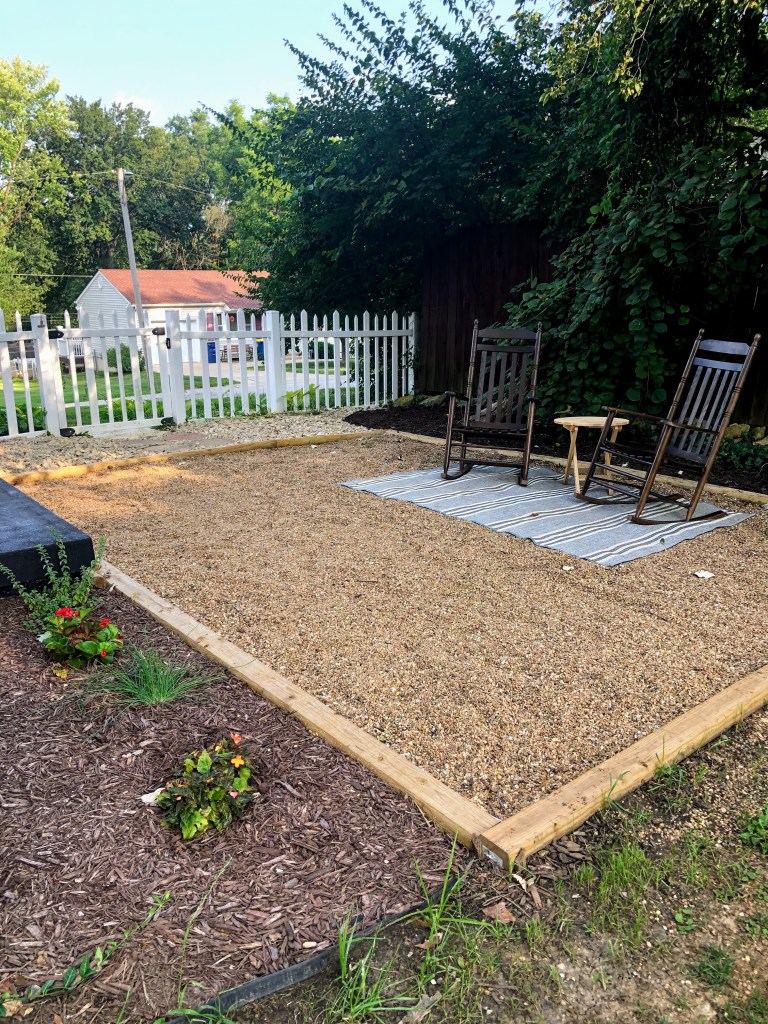
Add a border with timber, pavers, or plastic/metal edging.
We decided to use landscape timber for the edging. Along the edges of your newly-created pea gravel patio, add the timber edging. You’ll have to lay it all around the perimeter to see where you need to make cuts and later you can join the timber with corner and mending braces using deck screws.
Before laying the timber logs, I knew I didn’t want the edges flush with the surrounding yard because I wanted the border to prevent gravel from getting into it. For this, we simply laid it around the edges and moved on to the next step without making adjustments. Next, secure the corners of the edging using the corner braces and deck screws. The rest of the timber can be joined using mending plates and deck screws.

After completing this project, the timber edges of our patio stick up about two inches higher than the gravel and it looks fine and is practical. Just be sure to trim any excess landscaping fabric from the perimeter of your patio if any is sticking out from the border. Finally, we decided to cut down some stakes and use them around the corners of the timber edging to prevent any movement of the timber from the soil. It’s firmly in place.
Overall, the process took us about two weeks to complete, with a handful of those days off in between since some steps were so labor intensive and summers in the Midwest can be brutal.
We spent our first day ripping out our old deck and disposing of that lumber, so consider this an added step if you need to get anything like that removed first. We also had to rip out a rather large concrete step that was connected to a small concrete porch under the decking.

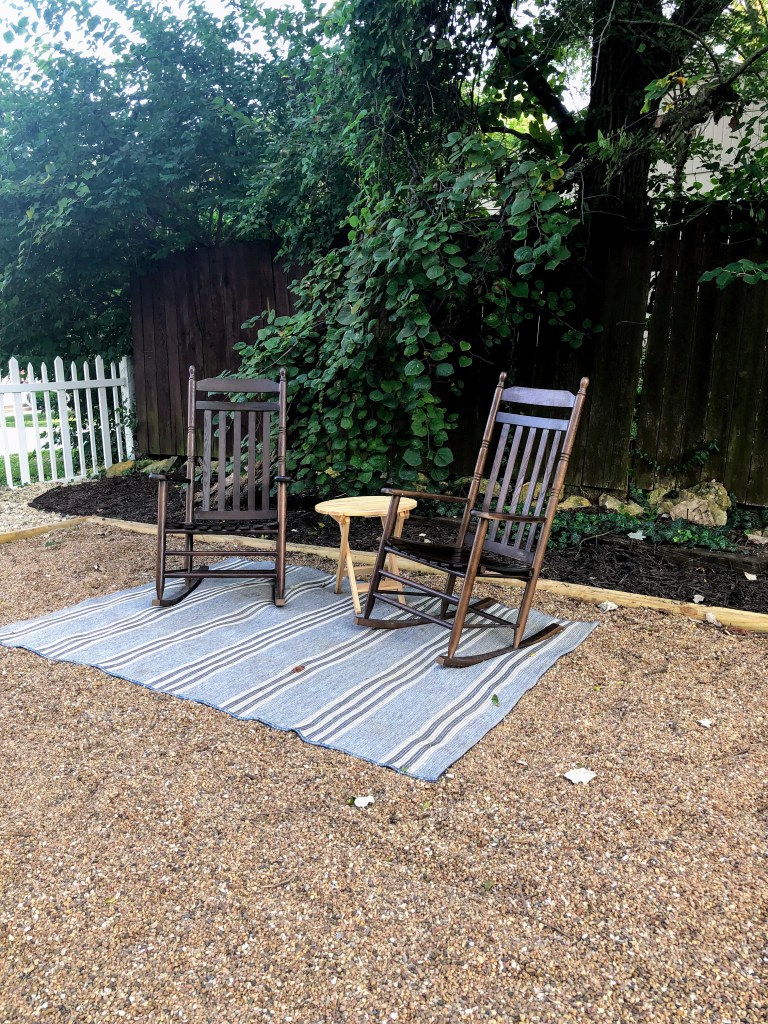
How We Styled Our Pea Gravel Patio
We added a rug, a set of walnut-stained rocking chairs, a small unstained table and several small items to give the patio a more welcoming feel.
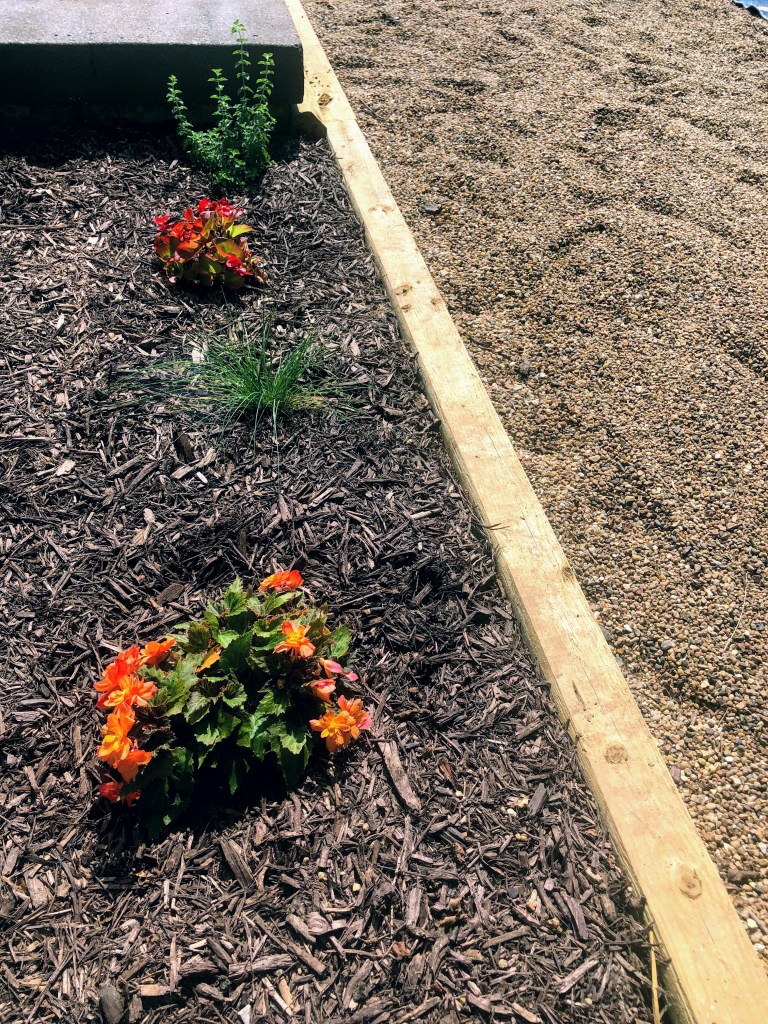
A bamboo wind chime was added with some hummingbird feeders, and I also created a small flower bed on each side of the concrete porch, too. We added brown mulch to this to give the patio a lovely contrast and mesh well with our stained concrete porch. I plan on adding a small fire pit at a later date for those cool fall evenings, but I honestly think for the most part we are done.
It’s big enough for the two of us and if we want to have a couple of friends over, we now proudly have a charming space for outdoor relaxation.
Tips – Install a Pea Gravel Patio
- If you have any visible pipes in your yard that are complete eyesores, think of this as an opportunity to get these buried while you’re digging. We have a long PVC pipe that extends from our basement, around the patio. It’s connected to a sump pump inside, where it pumps water away from the house and downhill toward our front lawn. In order to cover this unsightly pipe, we simply dug a small trench around the patio after we finished it. We buried the pipe and no longer have it in view. If you have something similar, consider doing this along with your project for a more put-together look.
- Make sure to buy more gravel than you think you’ll need. It is always better to have a little extra! If you have leftover unopened bags, return them for a refund or save them for your next landscaping project. Gravel is so versatile.
- I’d recommend buying gravel from a landscaping company to save money. Personally, we had to purchase the bags because we live on a steep hill. We knew it would be much easier to haul it uphill. Not to mention, less of a mess.

I hope you’ve enjoyed learning how to install a pea gravel patio and this guide is useful for you. DIY projects like this take a lot of work, but they’re so rewarding.
More DIY Projects:
How to Strip a Door for Beginners
Refinish a Bathtub in 3 Easy Steps
How to Make an Old Door Look New
How to Lay Hexagonal Floor Tile
If you enjoyed this content, please take the time to subscribe to my blog at the top of this page. You’ll never miss a post!

11 thoughts on “How to Install the Pea Gravel Patio of Your Dreams”