Learn how to refinish a bathtub in just three easy steps. This simple tutorial, designed for beginners, will help you transform your tub today with less than $50.

Have no idea how to refinish a bathtub? You may think it sounds like a complicated task.
I was very skeptical when I found out this was a DIY project I could tackle on my own. My husband and I assumed we either needed to pay a professional to do it, or that we’d just need a new tub altogether. And we couldn’t afford either of these options.
After some research online, I realized it was pretty affordable to refinish a bathtub. Within a few hours I had a sparkling, brand-new-looking bathtub.
I had been wanting to remodel our gross bathroom from day one, but it kept getting pushed back. Due to costs and how extensively we needed to remodel it. I was intimidated to say the least.
There’s also the fact that since we only have one bathroom and most of our renovation would require us to turn the water off for a couple of days minimum. We wouldn’t have had a bathroom to use that entire time.
Then, we finally decided to start phase one of the bathroom renovation that includes the shower-bathtub portion…
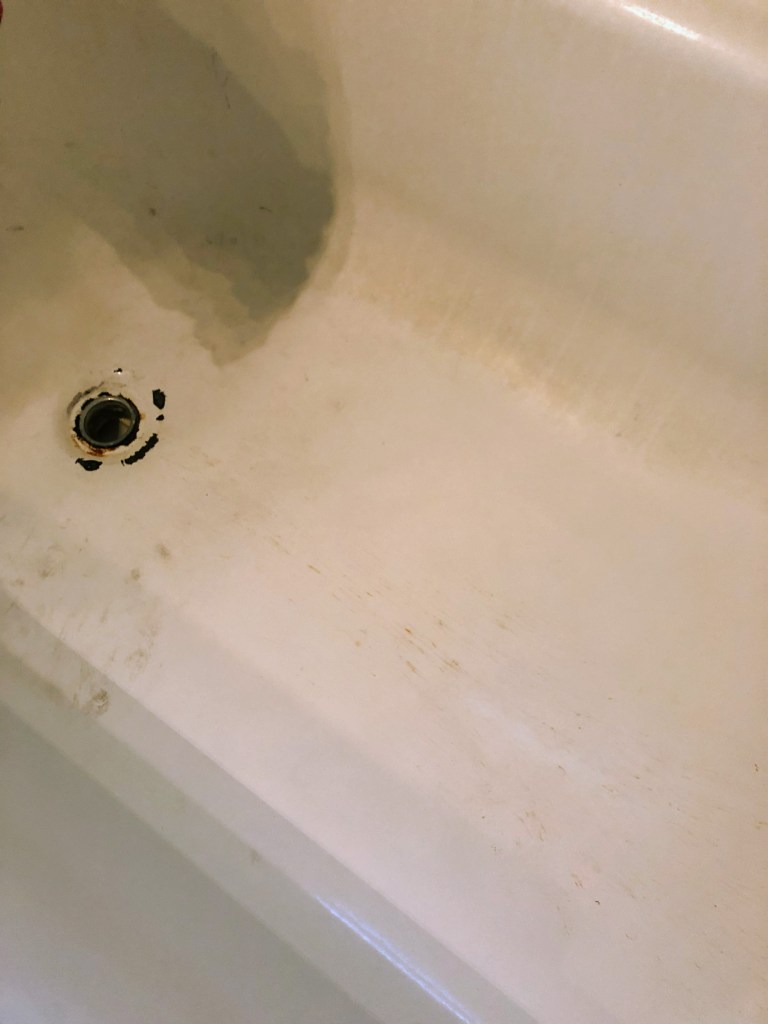
We have an old tub that had scum and dirt and orange streaks stained into it from years of neglect. This was from the previous owners of our home. Apparently they didn’t believe in cleaning much…
No matter how hard I’d scrub or what chemicals I’d use nothing seemed to touch it.
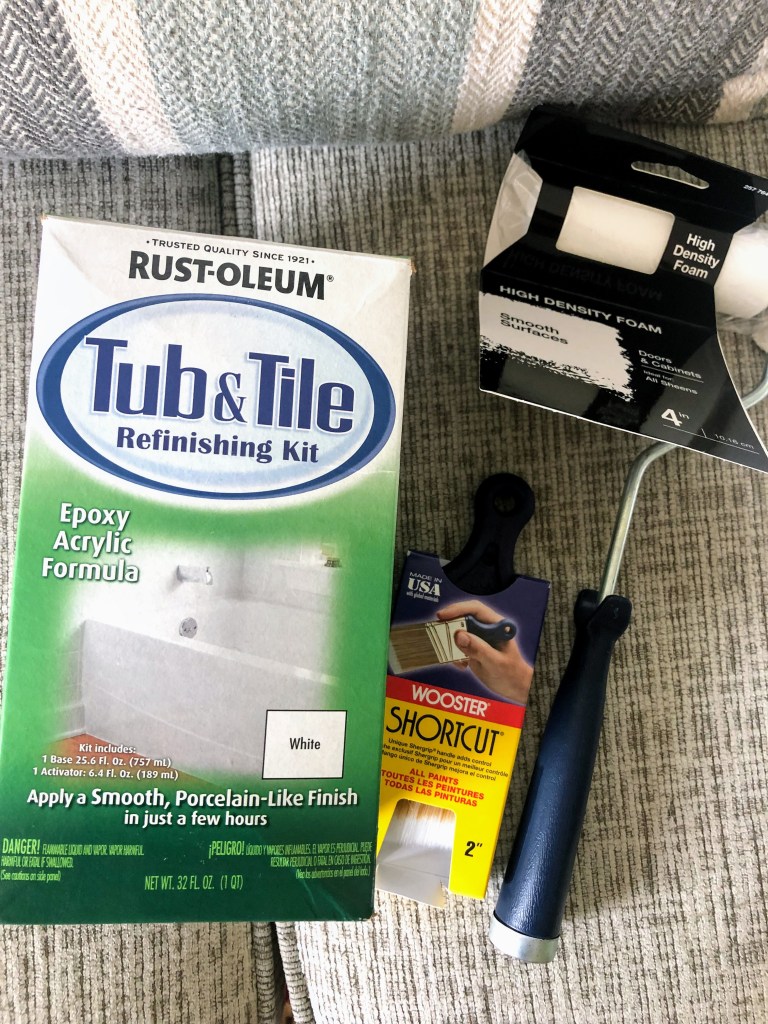
I set out on a journey to get a new, clean tub for a fraction of the cost. I decided on this $35 tub and tile refinishing kit that I was able to pick up from Home Depot.
After reading through the instructions, I was nervous but knew I wanted to do this project on my own. I was excited to gain a new skill.
I had painted many, many walls, floors, baseboards, window mouldings and so on over the last year since we moved into our home. But painting a tub I had not.
Armed with a few supplies, I was ready to take on this bathtub.
Supplies and Tools to Refinish a Bathtub in 3 Easy Steps
- Tub & tile refinishing kit
- Package of 120 grit sandpaper
- Sanding block
- Angled paint brush
- Painter’s tape
- Cleaning solution
- Towels
- Drop cloth
Refinish a Bathtub in 3 Easy Steps
Disclaimer: After refinishing, do NOT use a bathtub mat inside your tub, as this can lead to water puddling up underneath, creating rust over time.

Step One
Prepping
To prepare the bathtub I first needed to remove any caulking and hardware around the tub. Then clean it really well. I used Wet and Forget shower cleaning spray. After spraying it on, I left the room for a while to focus on another chore for about 30 minutes. Later I came back to wipe it down before letting the newly cleaned tub dry. Let me make this clear: I’m sure this product actually does clean surfaces, but it didn’t get rid of the nasty grime I so desperately needed to get rid of. Instead of wasting my time on scrubbing, I accepted that a cleaning solution can only do so much.
Step Two
Sanding
I knew that sanding would be an essential step to this project. There ended up being a few orange streaks still left afterward, but the paint (step three) ended up covering it up, so no big deal.
Grab a package of 120 grit sandpaper along with a sanding block and sand the walls and floor of the tub. This took me nearly an hour to sand off all the grime and ickiness that no chemicals could cut through. It was fairly easy, though, just a bit tedious.
Around the curves of the tub I’d take the sandpaper off the block to get everything sanded—it’s really important to not miss any spots. Even if you can’t visibly see anything, you need to roughen up the surface a bit to help the paint stick once it’s applied. Then make sure to wipe the tub down again to pick up any debris. I used a handheld vacuum to pick up most of it and then used a rag to get the rest. Now you can tape around the edges and put a drop cloth on the floor, so you don’t get acrylic paint everywhere.
Step Three
Painting
After sanding, it was finally time to apply the paint. The kit comes with two cans—the base and activator—and you’ll need to mix these two together. Before you do any of that you’ll need to take a few precautions, though. It’s recommended to wear a respirator while working with chemicals like these, so I wore one for most of the time. Open any windows, get a fan going; you just don’t want to be inhaling this while you’re trapped in a small room like a bathroom.
Using a paint mixing stick, stir the activator into the base really well. The directions say you don’t have to wait and can immediately apply it. However, from my experience, the mixture was more homogeneous after it had been sitting a while. I realized this when I went to apply the second coat.
The first coat went on almost translucently, and I wasn’t sure it was working until I noticed the second coat went on much better. Just be sure to stir really well or you’ll end up needing a third coat. Plan on applying two coats total. The good thing is you only need to 1-2 hours between coats for it to dry. I think it’s worth mentioning to work quickly because of its quick drying time. The paint is rather thick, but it is possible to neatly get the coat applied evenly before it begins drying. Start painting the part of the tub farthest away and work toward yourself so you don’t end up with paint all over your hands, which is very hard to clean off unless you have the right stuff.
At this point, once you’ve finished your two coats, you’ll need to let it be for three days.
You can’t get it wet for the entire three days, so you’ll need to have somewhere else to bathe, whether it’s a second bathroom in your home or a family member’s shower.
I did notice that a strong odor stayed in the house for about 24 hours, but luckily we were able to keep our bathroom window open overnight which helped some of the fumes escape.
Also, if you have any acrylic paint on your hands, wash them first to loosen up the soap. Then try either oil or rubbing alcohol to get it off and that should work. Believe me, you do not want this stuff stuck on because it’s terrible.
After the tub is dry remove any tape you applied before and admire your “new” bathtub.

I love how bright and white it is.
It looks and feels clean and looks professionally done. I can’t imagine paying someone to do this or replacing an entire tub now that I’ve done this simple refinishing project for less than $50 in just a few short hours.
I can’t wait to complete the next big phase and show you all the reveal in a few weeks.
More DIY Inspiration
How to Install a Pea Gravel Patio
My Best Painting Tips for Beginners

10 thoughts on “How to Refinish a Bathtub in 3 Easy Steps”