Discover how to make the easiest DIY ceiling medallion that will fool everyone into thinking you had it custom made by a professional. Complete this project in an afternoon and enjoy it for years to come.
This post may contain affiliate links. Please read our disclosure policy.
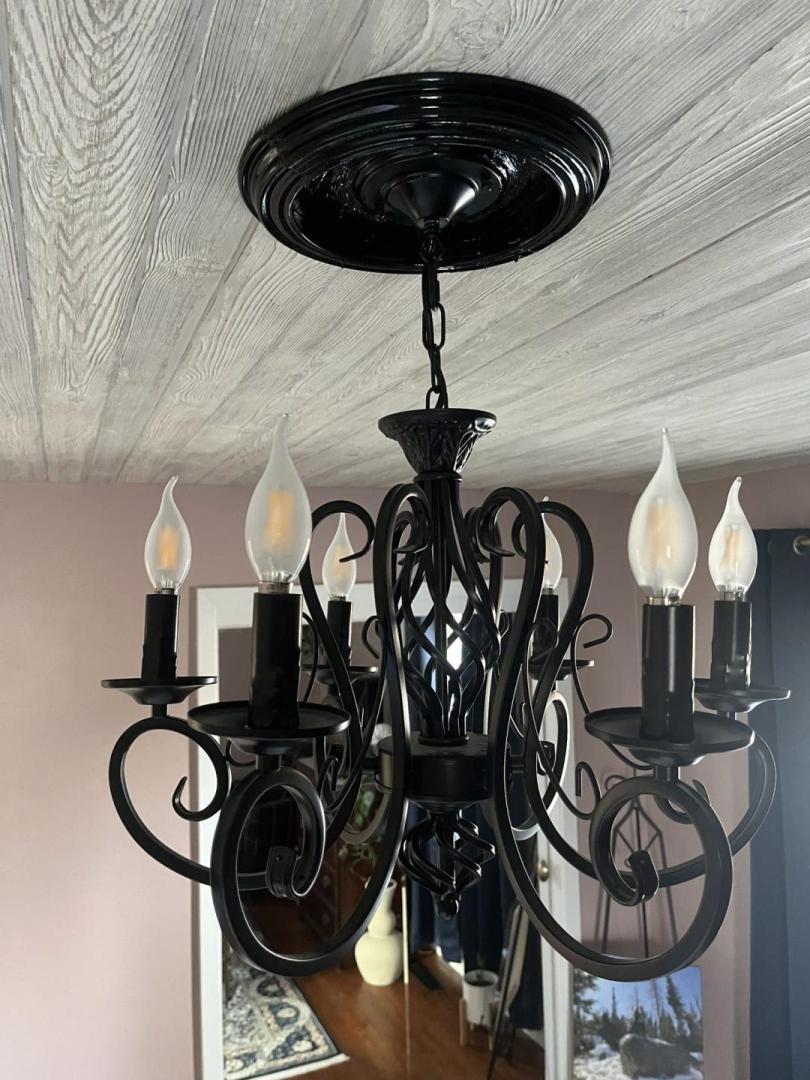
If you’ve followed along on our home renovation journey, you’ll know that AJ and I have just finished up our bedroom ceiling. (You can read more about that HERE.) But right now, I want to talk more about the final touch we made to the ceiling: a DIY ceiling medallion.
We had been needing a medallion to go around the circumference of the chandelier after installing it. Since we made a fairly jagged cut to create a center opening in the plywood planks we added to the ceiling, we were left with a not very aesthetic finish to this light fixture.
After doing thorough research online, I realized we were going to need to make a custom ceiling medallion for the chandelier.
I searched high and low and couldn’t find anything that would fit the size we needed. Since I didn’t want to pay an arm and a leg for someone else to custom-make a medallion, we took it upon ourselves to create one.
I had seen a few ideas in different online spaces, but ultimately decided on repurposing a thrifted round picture frame. After a few nails and some paint, this light fixture looks so much more put together.
The best part? It only cost $2.
That is the beauty of thrifting. It pays off to repurpose old things–and we are thrilled it took so little time to complete. Especially after putting so much time into caulking seams in the ceiling boards the week before.
I will admit that we already had a nail gun and some black paint on hand. If you don’t have those things, you will spend a little more on this project. But if you’re DIY-ers like we are, you likely already have access to some paint and tools like these.
I’m sure you are ready to hear all about putting this DIY ceiling medallion together, so I will save you time and jump into all of the little details now… I hope you enjoy this project as much as I did!

Easy $2 DIY Ceiling Medallion
Do I have to use a wooden picture frame?
Yes, a wooden frame is highly recommended. That is what I used, so I can’t say whether this project would work with plastic or aluminum frames. Other materials may require other types of fasteners in order to effectively stay put.
What size frame do I need? What shape should I choose?
You will need to decide for yourself how large and dramatic (or small and simple) you’d like your medallion to be. I recommend going with a size that is 12” in diameter (or 12” in length if going with a square frame). I base the size of a light fixture off the size of the room I’m putting it in, and I use this same rule for medallions (since it will become part of the fixture, after all– albeit a decorative addition).
Choose a style/shape based on what’s available to you and what fits well with your light fixture style. (For example, a more regal light fixture would look best with a more detailed frame, where a more plain fixture looks best with a simpler frame.) I would stick with something circular or square over oval/rectangular, personally. It just seems easier to center these when installing.
Will this work on all types of ceilings?
This isn’t recommended on popcorn ceilings. The texture makes it hard to paint (because the popcorn will begin to peel off and make a mess) and even if the paint does apply well, it may not disguise the rough texture of the popcorn ceiling very well. It won’t look as cohesive, like one medallion piece.
Here are some ceilings that this project works well with:
- Beadboard
- Plywood
- Flat, even ceilings
- Shiplap

Supplies | DIY Ceiling Medallion
Repurposed wooden picture frame
Interior latex paint (or oil-based paint if matching the sheen of the light fixture)
Artist’s paint brush, angled
2-inch brad nails
Brad nailer with compressor (We use this Craftsman one HERE)
Spackling paste, optional
Circular saw, optional
Drill, optional

How to Make a DIY Ceiling Medallion
Wipe down the frame and remove any latches or existing nails, along with the glass and art/photo.

Add a layer of paint to the frame and let it dry. Repeat with additional layers of paint if needed.

If you don’t want to remove the entire light fixture (especially a tricky chandelier), cut the wood frame in half. Later, after nailing it in place, you can always fill any seams with spackling paste and paint over it to disguise the cuts.

Fit it around the chandelier chain, centering it. Use a pencil to mark the placement of it, if necessary.
Using a brad nailer, add nails to one side of the wood frame. If you’ve cut the frame in half, next carefully line the second half up to it before beginning nailing the second half into place. Add a total of 4-6 nails around the entire frame to secure it in place.
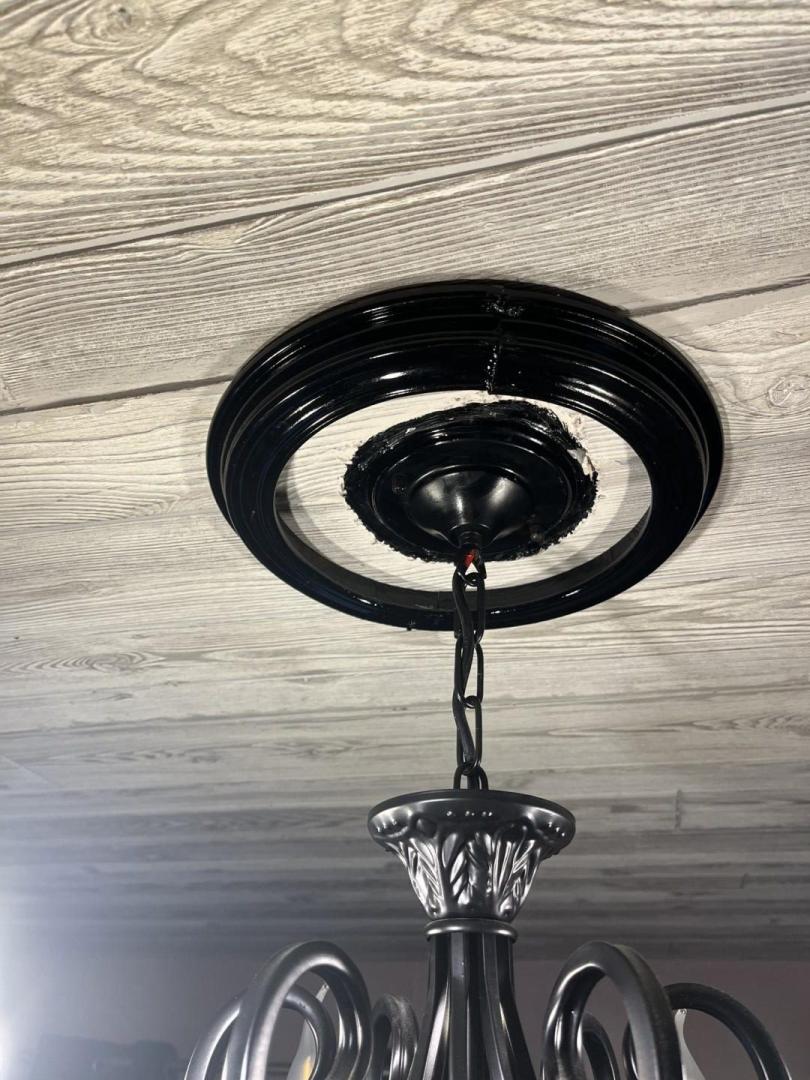
If you’ve cut the frame in half before installing and are left with visible seams, fill these with spackling paste. Allow to fully dry.
Touch up the spackling paste with paint. Then paint the inside of the circumference of the wood frame to match the frame color.

Tips for Success | DIY Ceiling Medallion
Flat/matte paint works best for ceilings, so this is a great option for the paint sheen on your medallion. However, if you want to match the sheen of the medallion to the light fixture–which is usually shinier–I recommend using an oil-based paint. Just know that if you use an oil-based paint, it will highlight uneven/textured ceilings more. The boards on our ceiling have a raised grain, so using an oil-based paint highlighted that. It’s not in plain view, though, so we decided to leave it.
Be sure to have another pair of hands to help when nailing this in place. This step is not really meant for one person to do alone. One person should hold the medallion in place, keeping it perfectly centered, as the other person uses the nailer to add nails along the circumference of the wood frame.
More DIY Projects for Your Home
How to Install a Pea Gravel Patio
Refinish Wood Furniture the Right Way
How to Strip Paint from Wood Doors

4 thoughts on “Easy $2 DIY Ceiling Medallion”