Discover how to DIY a makeover for your dresser using marbled porcelain tiles. A stunning result, this dresser is reminiscent of antique marble top dressers without the expensive cost. This piece is great for older homes or those looking to add vintage-style pieces to a modern home.

This post may contain affiliate links. Please read our disclosure policy.
Furniture makeovers are quickly gaining popularity in our household. With warmer weather and plenty of old furniture to refresh, it’s becoming an easy way to get ahead on DIY projects that won’t break the bank or take too much time.
This summer we’ve put a hold on any major home renovations. Don’t worry, we will be returning with a huge kitchen makeover in the fall/winter.
Instead, I’ve been dedicating my time to curating pieces and DIY-ing older pieces to add to two of the bedrooms in our 1950s home.


We are focusing on decorating both the office and the master bedroom this summer. I couldn’t be more excited. More frequent projects, but less strenuous ones, make me very happy. I will be able to focus more on the design aspect of homemaking for the next couple of months.
One project I knew that would be at the top of the list for the master bedroom would be a DIY dresser makeover.
I absolutely love all the traditional wide dressers I see on the market today (and many more of the antique ones). But with our budget in mind, I decided to just stick with a DIY dresser makeover using an old chest of drawers instead.
I had plenty of tile leftover from our Bathroom Makeover we completed last fall and have been waiting for a project to use them on. I was so happy to not have to spend very much at all on this refresh.
The final look of this dresser is stunning and reminds me of all the antique marble top dressers I see in collectors’ homes.

We really just needed the top of this dresser refreshed, and the porcelain tile sure had a dramatic effect I was going for. Don’t you love it?
Come see exactly how I went about this DIY dresser makeover…
Supplies for Marble Top Dresser
Tile snapper, optional
Plastic spatula
Scissors
Tile adhesive (I used this tile adhesive HERE)
Grout (I used this warm grey grout HERE)
Grout float
Bucket of water
Grout sponge

Tips – DIY Dresser Makeover
If you’re using hexagonal tiles like I did, you will have to make cuts to the tile, which means some edges will not look the prettiest. Even if cuts are perfect and clean the grout and even tile adhesive underneath may show around the edges. To cover this, you can choose to buy some thin trim to add around the edges. I ordered 1/2″ peel-and-stick trim to add to mine.
If you made a bit of a mess after grouting, wipe along the edges of the tiled area with a wet towel. After it dries and any tape is removed from the edges, carefully use a straight razor to chip away any excess.
Making practice cuts when working with a new tile cutter really helps. Hopefully you purchased a few extra sheets or pieces of tile. Having this on hand for a bit of practice helps immensely.
If you’re cutting sheets of hexagonal tiles, it can be tempting to only cut a single tile at a time if that’s all you need. I used scissors to cut a single tile out to then use the tile snapper to cut in half and things didn’t go as well. Keep them on the sheet to make cuts with the tile cutter. Small tiles are much harder to cut than a sheet or a larger tile piece. This will prevent jagged cuts and shattering pieces of tile.

DIY Dresser Makeover
Step One
Measure the top of the dresser and order supplies. This is essential because you’ll need to know how much tile to purchase. I recommend buying sheets that come in about 1 sq. foot pieces to make it easier. Be sure to order a little extra just in case any tile breaks during transport, tile cutting, or installation. You can always return any extra later. It’s important to get as many supplies as possible beforehand, so you aren’t scrambling at the last minute. If you already have some of these on hand, even better.
My dresser top measured about 18 ½ x32”. I only used about 3 sheets of tile, with a few extra single tiles to fill in around the edges.

Step Two
Lay tile out exactly how you’ll be laying them with tile adhesive later. You cannot skip this step. You need to see everything laid out first before making cuts and adhering the tiles onto the dresser. Tile adhesive is strong. If you mess up tiles are not impossible to remove, but it can be difficult…
Start in one corner by placing edges of the tile flush with the edges of the dresser and go from there. Once you get your sheets down, you may need to use scissors to cut the remaining sheet of tiles apart to fill in any gaps.

At first laying all the tiles out will seem like a jigsaw puzzle, fitting all the sheets together piece by piece. But I promise it’s not that hard. Be sure to lay the sheets with a little space in between, so it matches the spacing of the tiles on the sheets, too. This way all the joints are even, and you can’t tell where one sheet ends and another begins.

Step Three
Count how many missing pieces are around the edges. After laying all the sheets out, step back and survey the edges. There will be some missing half pieces if you’re using hexagonal tiles like I did. If this is the case, count how many halves you need. This will come in handy during the next step. If you’re using hexagonal tiles: Be certain of the shape you need for filling each edge gap. There are six sides on a hexagon and depending which way you cut it in half will determine the final shape of the tile. Parallel edges will have the same tile shape, while perpendicular edges will have opposite shapes. Corner pieces are tricky, but I’ll discuss that in the next step.


Step Four
Make cuts with a tile snapper. Especially if you’re using hexagonal tiles that are already in sheets, you’ll need to make some cuts for covering the entire area of the dresser top. This tile cutter was great and well worth the $110 I paid. It is easy to use, cutting tile up to ½-inch thick. I watched this YouTube video HERE , made a few practice cuts, and it worked perfectly. I was making cuts like a pro in no time.
Be sure to cut enough to cover the entire area of the dresser top plus any extra tiles to fill in the missing edge pieces. For corners, things get complicated if you’re working with hexagonal tiles. If you try to cut half pieces in half again, for the four corners, you risk shattering them. I did this and was able to still salvage them, using extra grout where chips occurred, but please be careful.

Step Five
Use tile adhesive to start laying tiles. I personally used a premixed tile adhesive, so it was ready to go when I started. Use a small plastic spatula to spread it on the dresser top, carefully placing the tiles/sheets on top.
Start by working your way from the farthest corner to the corner closest to you. Again, make sure to leave enough space between sheets and individual tiles to match the joint spacing of tile on the sheets. This way, each sheet will blend in seamlessly with the others.


Step Six
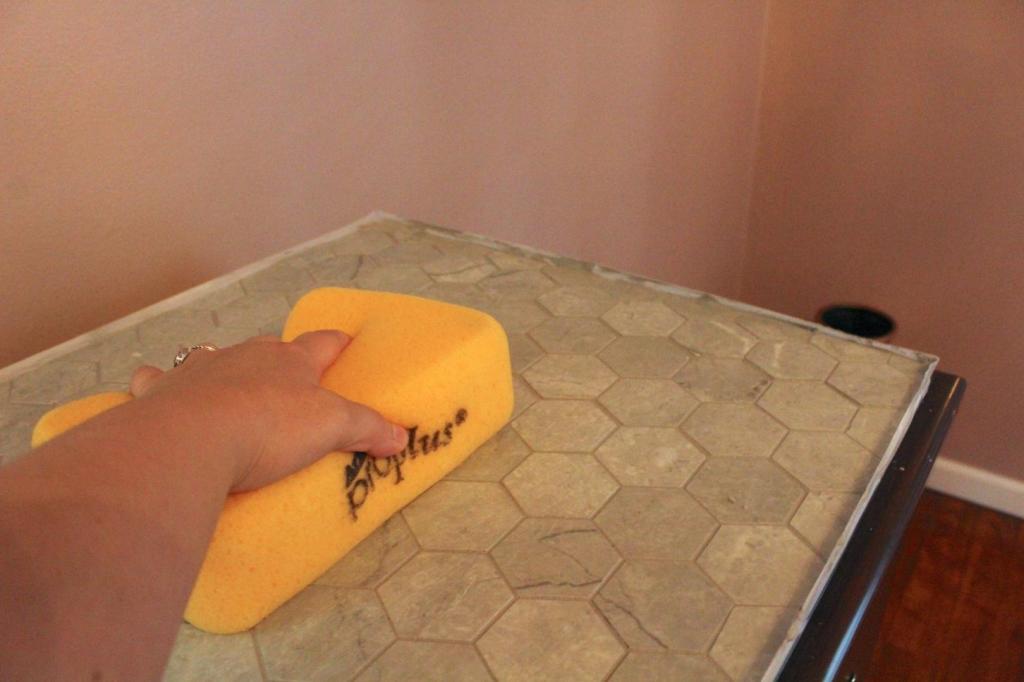
Grout between the tiles. After the wait time is over and the adhesive has cured, about 24 hours, it is time to grout. To begin, I taped the edges of the tile first. Following the directions on the grout packaging, you’ll mix up the grout powder with water until a paste forms. Using your grout floater, spread grout over and across tiles at a 45° angle. Make sure grout gets pushed into all the joints between the tiles, filling them before wiping them flush. After letting the grout sit for 15-30 minutes, begin cleaning the excess grout off the tiles and wiping them clean. To do this, use a bucket of water to dip the sponge into and wring out excess water before using. After using the grout sponge to wipe the tile, wring it after each wipe before using it again. Repeat until the tile is clean.


Step Seven
Clean the tiles the day after. The day after, you will most likely still have a cloudy haze on the tile no matter how clean you had it the day before. First remove any tape. Then, simply wipe tile clean with a towel and a 1:1 ratio of vinegar to water. It should be sparkly clean after wiping down.


More DIY Project Inspiration
How to Strip Paint from a Wood Door

18 thoughts on “DIY Dresser Makeover – Marble Top with Tiles”