These vegetarian charcuterie board ideas will inspire your next gathering. Learn how to select and style foods for a stunning presentation with these ideas, tips, and tricks on how to build a charcuterie board.

This post may contain affiliate links. Please read our disclosure policy.
Who doesn’t love a good charcuterie board? I for one can say that I love the idea because they’re easy to make, they can look really beautiful and serve many for large gatherings, and they offer a wide variety of foods in one meal/snack.
As some of you may know, I eat a vegetarian diet. This means I have to switch up the traditional charcuterie board just a bit to fit my dietary preferences.
This is much easier than it sounds, though. So far, I haven’t had any issues trying to recreate charcuterie boards sans meat.
I personally love making these. It’s been a while, but the last time I did it (which was more a charcuterie plate for one) I had so many different flavors and it was the most satisfying meal. Sometimes I truly just want a little of this and that, nothing complicated, yet a variety in one sitting.
That’s why I love building charcuterie boards.
They feel fancy, but really you can tone this down by serving familiar foods your family knows and loves.
My mom will actually be assembling one for my Mother Blessing she’s hosting in my home for me in the next few weeks. She’s been asking me for ideas and how to set it up–so Mom, this post is also for you.
Here is a little direction on how to build a charcuterie board…
Benefits of a Charcuterie Board
- Convenient to assemble: little prep and no cooking
- Can be simple or very detailed and stunning for a nice presentation
- Size can vary from feeding anywhere from 2-20+ people
- Variety of foods for even the picky eaters
- Nutritious, serving all the major food groups on one big board
- All finger foods, which means easier clean up and great for snackers and grazers

What is a charcuterie board?
Charcuterie boards originated in France. They’re essentially fancy little (or large) wooden serving boards aesthetically organized with cheeses, fruits, nuts, and meats.
Of course, there are many more items you can add, and here in the states bloggers and chefs have invented lots of different takes on charcuterie boards. That means you don’t have to serve stinky cheeses on a platter if you prefer a sharp cheddar and Monterey Jack instead.
It also means you can have dessert boards, too. I’ve recently seen butter boards and even all candy boards in online spaces. You can really get creative with them.
What are some vegetarian options for my board?
- Faux sliced deli “meats”
- More cheese varieties
- Smoked salmon if you’re pescetarian
- Adding protein in other areas: nuts, hummus dips or dry roasted beans, and/or deviled eggs
- Include plenty of fruits and vegetables, along with crackers, baguette slices, or pretzels
- Don’t forget some sweet options too

How to Build a Vegetarian Charcuterie Board
Tools | vegetarian charcuterie board
One large wooden serving board OR several smaller ones
Kraft wrapping paper, optional–in lieu of wooden serving boards
Chef’s knife and cutting board, for food prep
Ingredients | vegetarian charcuterie board
Vegetables – Raw or roasted vegetables work great. I love mini sweet bell peppers, olives, and cherry tomatoes. Many enjoy carrots, radishes, cucumbers, broccoli, and more. If you want to use roasted veggies, buy the jarred, marinated ones for a bit more flavor.
Fruits – I love using grapes on a charcuterie board. This is classic and traditional. However, feel free to add pre-peeled wedges of citrus fruits, berries, apples slices, or any of your favorite fruits.
Grains – For carbs I like to use a traditional American buttery cracker for those who want something more plain (think: Ritz). I also like to serve crackers infused with herbs and oils or seeds for a fun twist. These have a nice presentation and give a variety to the board, especially for the adventurous eaters. Mini croissants or slices of baguette also work great. I’ve also seen some people add pretzels alongside these.
Protein – Deviled eggs are a fun and delicious finger food with some protein in them to add to a vegetarian charcuterie board. I always like to add a small bowl of nuts to the board, too. Finally, you can add a hummus dip or some dry roasted chickpeas or other beans for some added protein.
Dairy – Also a protein, I like to add 2-4 different cheeses to a charcuterie board, depending on how many people I’m serving. You’ll select a variety of colors and flavors for this. I don’t like fancy French cheeses and stick to basic American classics. But I at least serve two different looking cheeses (whether they differ in color, texture, or shape). Try to contrast the flavors. Maybe one is a mild mozzarella and another is a colby cheese. Or you may choose a simple cheddar along with a pepper jack for a slight kick. If you get into French cheeses, there are so many varieties.
Desserts – Chocolate squares, homemade candies, mini cakes or brownies, and delicate cookies are my favorite sweet treat ideas to add to a charcuterie board.
Extras – Fruit spreads/jam, honey, or mustard are great extras guests may love to spread on their crackers, “meats,” or cheeses for extra flavor.

Steps | how to build a vegetarian charcuterie board
Choose the right board or kraft paper for your number of guests and serving area.
How many guests are you serving? If you’re just making a small dinner board for a family of four you’ll be fine with a medium-sized wooden board, more than likely. If you have a larger guest count, you’ll want to make several boards to place on countertops or a large table.
I have been seeing professionals creating beautiful charcuterie arrangements on tabletops, directly on plain kraft wrapping paper. Simply wrap the portion of the table you wish to use for food placement and tape over the edges on the bottom of the table. Then place food directly on top. This makes for a very easy cleanup and much less dishes.

Add small bowls or ramekins first.
Spoon hummus, spreads, olives, nuts, berries, or jams/honey into small serving bowls and place these in various places around the board. Doing this gives clear dishes to start working around.

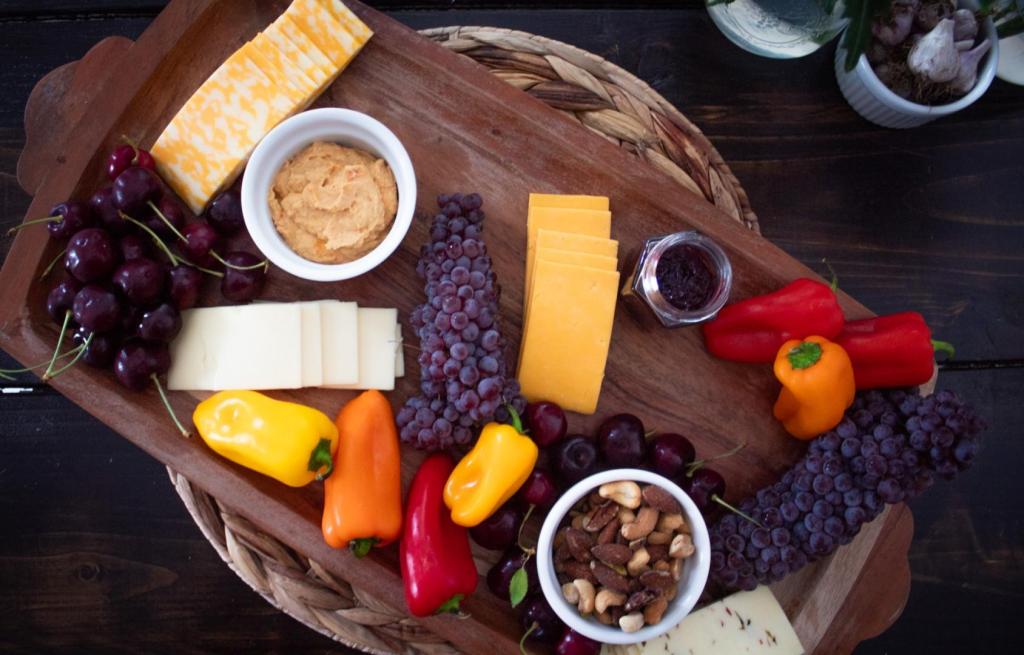
Start with the main (largest) foods first: protein and dairy.
Start adding the biggest portions first; this is the protein and dairy. Cheese, faux meats, and deviled eggs are the main event, so everything should be assembled around these. Start from the center and work your way out. Leave spaces for nestling in fruits, veggies, and grains next.

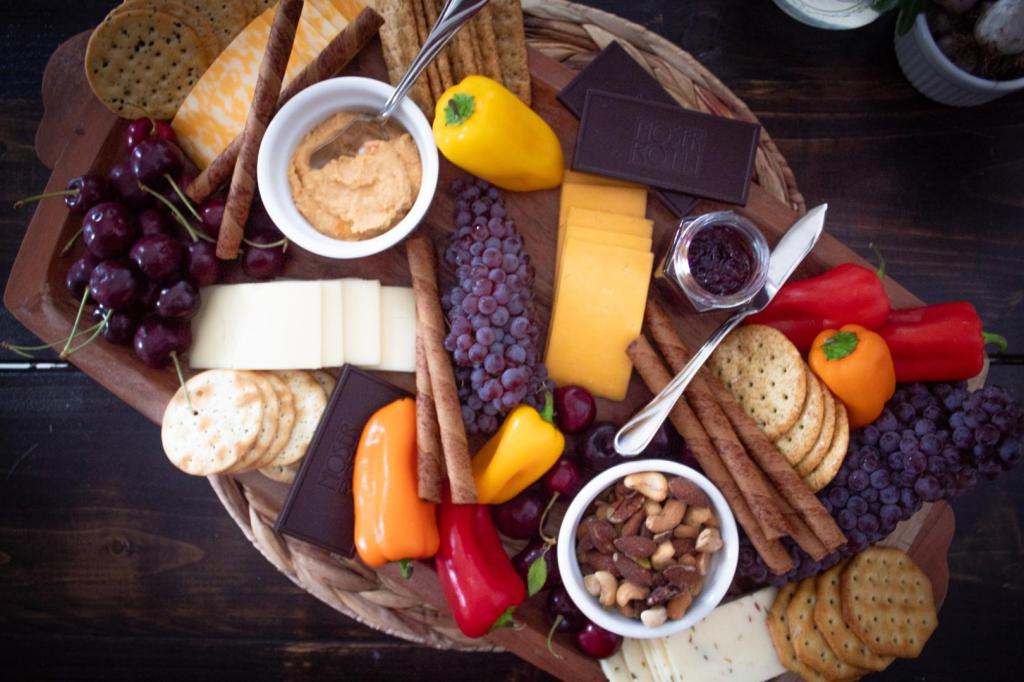
Add in veggies, fruits, and then grains.
Begin adding in sliced veggies and fruits around the cheeses and “meats,” adding pops of color where needed. Try to do this in such a way that each food group is not in one spot. The whole key of styling charcuterie boards is to vary colors, flavors, textures, etc. for a stunning presentation. Put different foods alongside one another for the best effect.
Finally add sweets here and there.
You do not need a separate board for sweets, unless you really have the urge to style a second dessert board. Foods like chocolate wedges, holiday candies, and cookies can be mixed near other foods.
However, if you want to keep them somewhat separate, organize the sweets along the outside of the charcuterie board so no one complains about their dark chocolate tasting of peppered deli “beef” slices. It is also wise to place them alongside fruits since they have similar sweet flavors.

Don’t forget serving utensils.
This is mainly for your “extras” like honey and spread, or dips such as hummus. It’s also nice to consider using a small set of tongs for serving faux meats and cheeses. Although these are finger foods, guests will not want to touch everything on the board that other guests will be eating from.
Tips for Success | how to build a charcuterie board
Vary board sizes and designs for larger guest counts. Adding this into the design allows you to break up different boards into different themes if you wish (e.g. cookie/candy board, fruit and cheese board, meat and bread board, etc.). It also just looks nice seeing a mishmash of different pieces served together. Get past the idea that matchy-matchy is a good thing.
For events, prepare kraft paper the night before by writing out the placement of foods for a quicker assembly the day of the gathering. Use a sharpie marker to write “blue cheese,” “gouda,” “pesto,” “olives,” etc. for a much faster assembly. You will have less thinking to do on the day of assembly and can just put it together.
Be mindful of certain flavors next to each other if they’ll be touching. Example: If you’re making a very American food board with sour, juicy pickle spears, don’t put these alongside grains that will get soggy. In fact, it’s probably best to serve these on some linens over the board to soak up some of the juices so everything touching it isn’t sour and wet.
Depending on the size of a charcuterie board(s) and if you have everything already pre-sliced, a charcuterie board set-up can take anywhere from 20 minutes to an hour to assemble. If you haven’t done much pre-planning and are working alone or prepping foods beforehand, add even more time. You want to wait as long as possible before putting it out so food is still fresh, but you also want to allow plenty of time to get stuff out of packages and styled before guests arrive.


One thought on “How to Build a Vegetarian Charcuterie Board”