I made this maternity sash belt with sunflowers to wear for our co-ed baby-q to celebrate our sweet baby on the way. Join me today to see my step-by-step tutorial for this super easy accessory. A must-have for any baby shower event!

This post may contain affiliate links. Please read our disclosure policy.
I can’t believe our baby will be here in about a month’s time. We just had a Baby-Q, hosted by my mother-in-law, a couple of weeks ago and then just a few days ago my own mom hosted a Mother Blessing for me.
Time has flown during this pregnancy, but I think we have most of the important stuff done.
I’ve been trying to take as many photos as possible during my pregnancy, at least since my belly has grown bigger and rounder. I have never heard a mom say, “I wish I’d taken less pictures during pregnancy.” Usually, it’s quite the opposite.
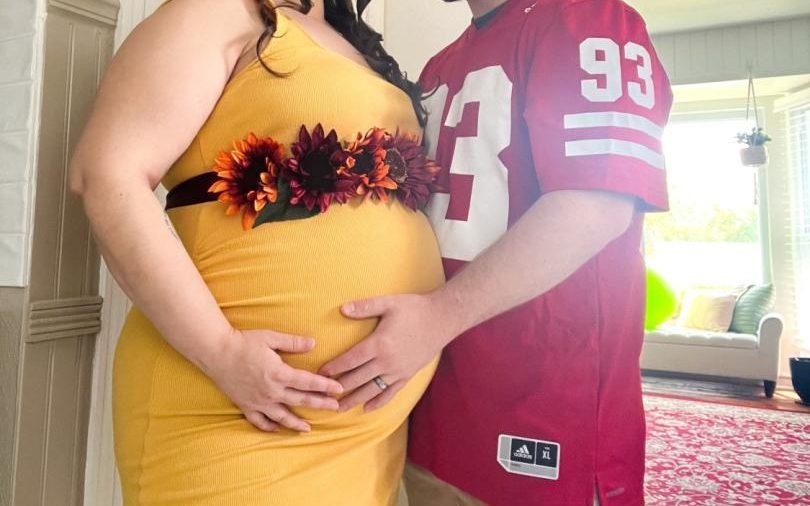
This beautiful maternity sash belt sure has given me an excuse to curate the perfect little photo-op.
Originally, I wore this piece to my co-ed Baby-Q–a modern version of a baby shower that is more casual and involves both men and women, where cookout food and beer are enjoyed, the baby is celebrated, both of the parents are showered with gifts for baby, and games are played with everyone.
I do have to say this belt sure does fit the Baby-Q theme.
If you do a quick Pinterest search it is very common to see sunflowers as decor during one of these events. Sunflowers are simple yet beautiful and just so happen to be in season during this time of year.
I opted for deep burgundy sunflowers to complement the yellow dress I wore and think it perfectly fit in. I was both comfortable and stylish that day.
You can of course use a more appropriate flower for your special day, but I do love the late summer look of these.
Now, let’s get into making this adorable maternity sash belt. I just know you’ll love it!

What faux flowers can I use for making this maternity sash belt?
- Daisies
- Roses
- Hydrangeas
- Orchids
- Chrysanthemums
- Peonies
- Dahlias

Can I add other embellishments to this?
There are an assortment of embellishments you could add to one of these sash belts. Sequins, faux leaves, or any other small pieces you desire can be added carefully using a hot glue gun. Try to keep these light and to a minimum to decrease any of these additions from falling off. The more you add, the more risk you take in them falling off later.


Sunflower Maternity Sash Belt DIY
Supplies/Materials | maternity sash belt
2-3 types of faux flowers of your choice, about 6-10 total depending on their size (I used these burgundy sunflowers HERE and rust orange sunflowers HERE)
Floral stem cutters
Scissors
Sewing tape measure

Steps | maternity sash belt
1. Start by unraveling the tape measure and comfortably fitting it around your waist. Aim for the area below your breasts, above your bump.
2. Once you’ve found where it will lay over your bump, allow the ends in the back to cascade down a little, about 18-24 inches. Ideally, you’ll want it long enough to tie in a bow and the tails to cascade down a bit. Take note of the total length on the tape measure.
3. Cut the ribbon to the length measured around your waist. Set aside for later.
4. Insert glue stick into hot glue gun and allow the gun to heat.
5. Remove stems from the flowers using floral cutters. Set aside.
6. Glue felt circles to the back of the flowers. Press them firmly on. These help the flowers stick to the ribbon better.
7. In the center of the length of the ribbon, begin arranging the flowers in a pattern you like. I recommend mixing colors and sizes for a more authentic style. Work from the center outwards.
8. Attach the larger flowers first using the hot glue gun. Press them firmly in. Leave some space for filler flowers in between. Add plenty of glue to ensure the weight of the flowers stays put.
9. Fill in spaces with the smaller filler flowers using the hot glue. You’ll want the flowers to all fit in snugly with one another.
10. Next allow all glue to dry and cure fully for several hours before attempting to try on the belt.
11. Once ready, test the belt by fitting it above and around your belly. Tie it in a knot and then a bow in the back. Allow the tails to cascade down.


Tips for Success | maternity sash belt
Choose a main flower and 1-2 filler flowers to fill in empty space on the sash belt. This helps the belt look fuller and more complete.
To secure and enforce heavier flowers, use a safety pin after adding hot glue to the belt to attach flowers. This will help them stay put for the entirety of your event.
Let the glue cure for several hours before attempting to wear the maternity sash belt. Failing to do so could lead to the flowers falling off.
When measuring the ribbon for the waist, be generous and add a couple of extra inches on. If you are making this a little early there is always the chance your belly will grow a bit more and it’s better to have a little extra you can trim off later than not enough.

More Maternity Inspiration
12 Pregnancy Must-Haves for Mom

One thought on “Maternity Sash Belt with Sunflowers | Baby Shower DIY”